The marble, a sphere of glass from about 15mm to 30mm or more in diameter. What could be simpler ? But check out the incredible things that the humble marble can do ! A small marble is a kind of microscope – the kind that led to the discovery of cells in animals and plants. A Marble Transistor, a kind of marble amplifier. What on Earth is that ? A marble can be used to record the weather. How does that work ? OK, only the sunshine, but that’s still pretty impressive. A 30mm marble will spin for 10 minutes on a glass surface. What could you use a marble that spins for 10 minutes for ? Maybe you can think of something, or just marvel at it, or analyze how it keeps going so long. Finally (for now) we look at the marvels of Chinese Magic Water Paper and it’s serendipitous combination with wet marbles. Click below to get the projects…
- Marble Microscope #marblemicroscope
- Marble Transistor #marbletransistor
- Marble Sun Recorder #sunrecorder
- Amazing Spinning Marble #spinningmarble
- Marbles and Magic Water Paper #magicwater
…
…
…
The Marble Microscope
It is obvious, when you think about it, that a clear marble will, in most cases, be a magnifying lens. I don’t quite know why we don’t particularly notice this, but it is a fact. First select one that looks smooth without too many surface or internal blemishes. Its probably obvious that you get a higher magnification with a small marble. But a really small marble is trickier to hold – you have to hold it VERY close to your eye and to what you are looking at. Place it over a page of a book, especially an area of colour images and look: you should see the complex pattern of multiple coloured dots used in colour printing. Even easier to see are the dots on an electronic display like a phone or computer. Try looking at your finger with one – you should see the ridges of your fingerprint as big as plough lines in a field !
Try writing a small letter on a marble, then looking from the other side, you will see the letter much magnified and laterally inverted.

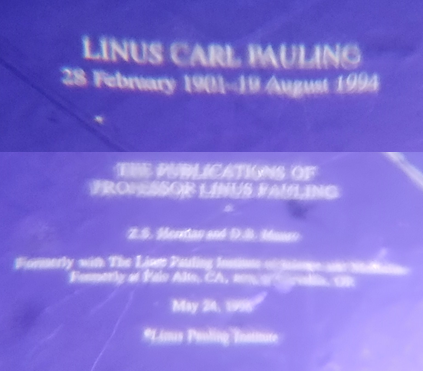
In a museum on the Greek island of Rhodes there is an example of a piece of rock crystal or quartz, pure silicon dioxide, cut into the lens shape by hand and then polished. It was probably made to allow jewelers to see their work better, and is thousands of years old. The enormous amount of labour that has to be expended to produce a small piece like this will be appreciated by anyone who has tried to shape by abrasion and then polish to a glassy surface such a hard material.
What you need
clear marble – select one that is as perfectly formed as possible
Tiny things to look at
What you do
Take the marble and, holding it very close to your eye, look at this printed page. Or simply look at your finger tip. Those huge plough lines are your fingerprint ! Try looking at a picture on a computer screen, or a printed picture of any kind. The pixels or line segments of the image, normally so small that our eyes perceive them as a smooth section of image, are easily shown. You will see that the middle of the magnified view looks relatively undistorted, while the edges and hopelessly blurred or ‘morphed’ or both.
Try focusing the sun’s rays with the marble. We look at how this can be used to monitor the sun below. Again, the sphere’s performance as a lens for concentration of light can be improved by using only optical paths that go roughly through the middle.
The Science
The sphere is an unusual example of a lens. Consider an axis through the middle of the marble. Imagine cutting off the very edges of the marbles, and think about the volume of glass within, say, 0.4 of the radius of the axis. In effect, you will then have two lens surfaces, a front surface and back surface, like any regular lens. The only difference is that you will have a very thick piece of flat glass in between them.
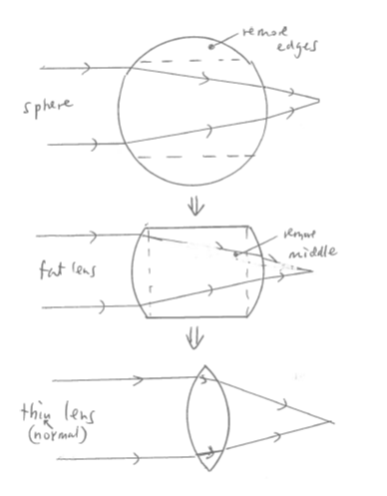
Most lens made by grinding a portion of a sphere onto the surface – which is most lenses – suffer what is known as spherical aberration. This means that they only form an exact, pin-sharp focus, for light rays very close to the axis. At larger angles to the axis, the focus will be slightly closer, or possibly slightly further, from axial focus. A sphere has a generous dose of this distortion, needless to say. Surprisingly, however, this distortion is reduced by the great thickness of the lens, which compensates.
The outer edges of the marbles don’t take too much part in the lens action, at least for light travelling in directions near to the axis because they will typically form very small angles with the incoming light. At these small angles, the light is mainly reflected.
And finally…
Why not try to make a marble telescope ? With a larger clear marble as the ‘objective’ lens, and a smaller one as the ‘eyepiece’, can you see a magnified image of a distant object ? You will need to use the very highest quality, most spherical, marbles. Can you get an image in focus ? How far apart do the marbles have to be ? What difference does using different sizes make ? What way around is the image you get ?
Antony Van LoewenHoek’s Microscopes
Loewenhoek’s microscopes were made from very small single lenses. As a child, I discovered that you can make your own microscope of this sort by smashing small tungsten lamps which were made with a narrowed end for small flashlight torches, and mounting the tip of the lamp in two small metal plates in an adjustable jig made from Meccano.
Microscopes, when they made it into the hands of later geniuses like Hooke and Pasteur and so forth, of course, led us to the whole modern science of biology and microbiology.
References
Robert Hooke, Micrographia Martyn & Allestry, London (1665)
Brian J. Ford, The Single Lens: the story of the simple microscope, Harpers & Row (1985)
Alan Macfarlane & Gerry Martin, The Glass Bathscaphe: How Glass Changed the World
…
…
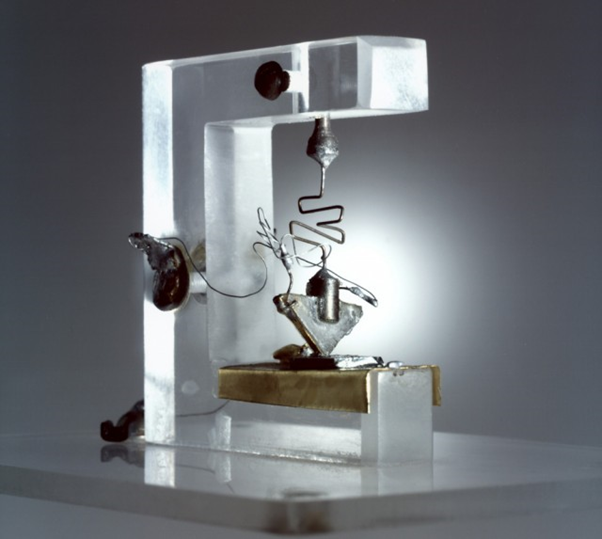
Marble Transistor
The first transistor was the first really efficient amplifying device which could be mass-produced. Although not the first electronic amplifier, it opened the floodgates to the whole new industry we now know as electronics. The fact that the transistor could, eventually, be reduced in size so that a millions could be fitted on a square millimeter allowed the practical realization of computers, which led to another whole industry, what might be thought of as the amplification of the human mind.
What you need
Marbles
20mm tube
Wood
Plastic container
What you do
Take
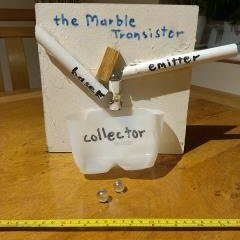
I found that a disposable plastic milk ‘bottle’, the 2.2 or 3.4 litre size (the sort made of PE (polythene) or similar) was ideal for the purpose: just cut off and use the base of the container 80 or 100mm from the bottom.
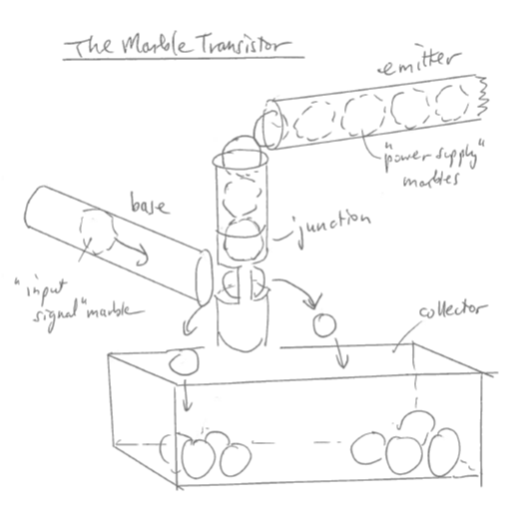
The marbles above that at the ‘junction’ hold the junction marble in place, and stand ready to drop down to replace it, when it is pinged out by the marble incoming from the base tube. The marbles in the sloping ‘emitter’ tube are on a slope because otherwise the pressure of the whole column of marbles above would lock the junction marble immovably in place, and prevent it being ejected by a low speed base marble. They also help to ensure that not too many marbles flood out from the emitter for each marble that goes in the base – the sluggish acceleration of the marbles in the emitter tube means that they won’t flow down in a continuous stream and they will allow the next marble in the junction to remain and block further emission until another base marble comes along.
You should find that, if all is well, for every single marble that you drop down the base tube, two marbles, or maybe three, end up in the collector. I named this device the ‘marble transistor’ because it gives you a useful mental model of a semiconductor transistor, at least as far as using transistors is concerned. (But don’t think that anything like this happens inside a semiconductor ! )
A real live semiconductor transistor can be thought of as a current amplifier: for every electron that goes in the base, N electrons go into the collector, where N >1. For a real transistor, by the way, N is typically 20 to 500, not 2 or 3 !
Does it make any differences how close together your input marbles are ? Maybe they can’t follow one another at zero spacing – but does the device still work when they are spaced apart by a centimeter or two ?
Can you link one marble transistor to another ? In the world of semiconductor transistors, this is an arrangement which is known as a ‘Darlington pair’, after Bell Labs’ Sid Darlington.
The Science
The key to the action of the Marble Transistor is the impact of the incoming marble in the base input. This hits the marble from the emitter and obeys the usual laws of conservation of energy and momentum. When a moving marble hits a similar marble square on, without rolling being involved, the input velocity v of the incoming marble is transferred to the other marble, which scuds off leaving the incoming marble approximately stationary. This is roughly what happens in the Marble Transistor, although not exactly.
The situation in the marble transistor is slightly more complex. Firstly, the stationary marble is being pressed down by another couple of marbles, which absorb some of its energy when the incoming marble hits. This also reflects back some energy to the incoming marble so that it is reflected to some extent. Secondly, the input marble is coming down a ramp, so not all of its energy is in its horizontal motion. And it doesn’t hit the emitter marble quite squarely.
The marble transistor makes a great model of a transistor. A mental model of a real transistor in which a single electron can stimulate the emission of up to several hundred emitter electrons to the collector is nearly all you need to design successful electronic circuits. The only other piece of information that you really need is to get electrons to flow through the base of a transistor, you need to apply several hundred millivolts – the ‘band-gap’ voltage. For standard silicon transistors this is around 6 or 7 hundred millivolts at room temperature.
And finally…
If you have two or more, try making a marble transistor feed another marble transistor. With a gain of 2 or 3 on each one, the output marble transistor should be giving 4 or 9 marbles. And with three transistors, somewhere between 8 and 27 !
Marble zig-zag feeder for marble transistor. The emitter tube length limits the supply of marbles into the marble transistor – and there has to be some kind of limit to that length. You might think that it would be easy just to have a huge tank with a conical funnel on the bottom. But it isn’t as easy as that. There might be some magic angle of funnel, or other ingenious design which does – try it out yourself – maybe you can find such an arrangement.
A less compact solution than a three-dimensional tank – although more compact than a long tube – would be a two-dimensional solution. Try using a sloping board with wedges from left and right, interlocking, with rounded wedge ends. Put the wedge axes about horizontal so that marbles gently roll down as in a Congreve Clock. The zig-zag is a considerable improvement over the long tube in another way: it can be loaded from above by simply pouring marbles in on mass, while still getting them fed one at a time into the amplifying junction.
…
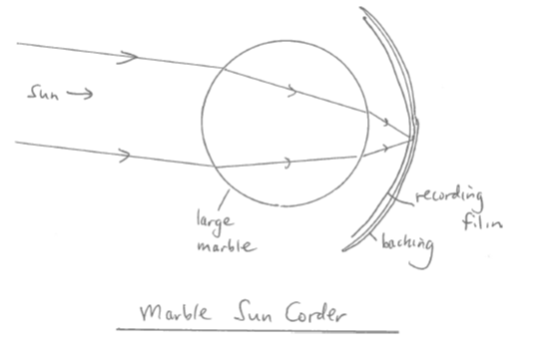
Marble Sun Recorder
A Marble Sun recorder burns a linear hole in a paper strip placed at the correct distance, angled correctly to horizontal according to season & latitude – length of linear hole give sunlight for the day. You can thermal fax paper with smaller marble for miniature version – has advantage that it doesn’t burn a hole completely through the paper and is more sensitive. Although simply using medium brown or grey paper will allow smaller marbles to work. This kind of paper absorbs better and thus heats up and burns quicker. And the sun recorder will also work with magnetic tape, as used in video and audio recorders, giving an even bigger advantages in sensitivity.
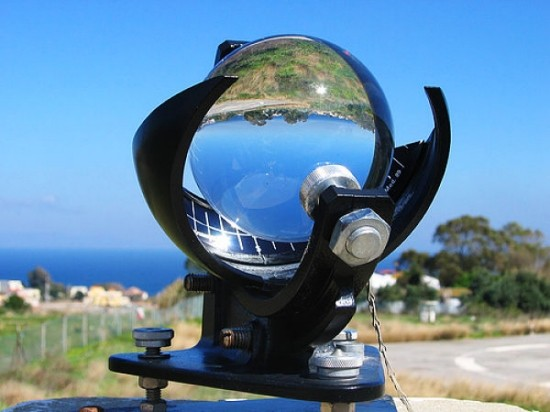
Originally invented by Campbell, a scientist more well-known for his work in fluid dynamics, Stokes, came up with the form that became the standard for sun recording, and is still used to some extent today. Burning glasses – largish lenses with shortish focal lengths – have long been used for heating things up. Famously, Joseph Priestley used a burning glass in his discovery of oxygen gas.
The nub of the invention was the realization that light can not only be focused from the sun using a sphere, but that it would remain in focus whatever the angle of the sun, the focus falling on a spherical shell a little larger than the glass sphere itself. Any other kind of lens would need to track the sun’s direction, at least in azimuth (time of day) and – although this could done by weekly adjustment – in elevation according to the time of year. The elegant simplicity of using a lens that didn’t need to track is considerable. And of course, the focus will move across a piece of paper pinned over that spherical shell, its position determined by the time of day: the system could make a complete sun recorder.
What you need
Large clear marble. A 22mm or 35mm is good, although it is possible to use a smaller marble with attention to the recording material.
Non-white paper: brown, grey or other colours – or sensitive paper such as thermal fax paper.
Other colored or dark thin-film material, such as magnetic tape (from tape recorder)
Meccano, Wood, glue etc for mounting system
What you do
The marble you use should be as perfect as possible, without patterns or bubbles inside and as smooth as possible on the outside without any coatings or similar.
If you can get hold of a truly huge marble (bigger than 22mm – 50mm or more in diameter is possible), then you have three advantages: firstly you won’t have to work quite so hard to find a sensitive recording paper, secondly, you won’t have to locate the paper quite so accurately at the correct distance from the centre of the marble, and thirdly, your Marble Suncorder will work when the sun is relatively low in the sky, and even when there is hazy cloud.
The marble to be used must first be tested for focus. This won’t be very far from the marble itself. Wear a pair of sunglasses if it helps, so that you can see the size of the focal point. Test out with just a piece of ceramic or something nonflammable at first. Then try with paper, and make sure that you can get the sun to char the paper. You may find that the charring action is best at a distance just a little further out that the sharpest focus of light. Measure this distance – which takes into account the presence of infrared light from the sun – that is the focus distance that you want.
Approximately, a 22mm marble will focus at 10mm from the back face (see box in Appendix). This means that the recording strip will need to fit on a circle of radius ½ x 22mm + 10mm = 21mm, or 42mm diameter. Similarly, a Brobdingnagian 44mm marble will need a circle of 84mm diameter.
Once you have measured this, you will need to create a cylindrical backing for the recording strip. I just used a strip of very thin plywood, pinned to other strips of wood to hold it in a semi-circle, with diameter equal to the marble + the focal distance. The strip should extend over, say, 90 or 180 degrees or so, and at approximately the correct elevation angle for the orbit of the sun at the time of year – this is simply the angle of latitude near to the equinoxes, of course, but higher in summer and lower in winter by the angle of the Earth’s tilt – 12 degrees or so ??
Once you have constructed a neat way of mounting the marble and the paper, you need to place the system, aligned with south at its maximum elevation of course, in a sunny spot with, as far as you can manage, a view of the sun throughout the whole day – as close to the horizon as possible if you have a strip as long as 180 degrees. Of course, if your recording strip only extends over 90 degrees, then you don’t need such as good all round view.
Once it has been exposed, remove the recording paper from the recorder and stretch it out ready for measurement.
You could make a paper scale with the hours of the day marked on it. The sun moves 360 degrees in 24 hours, or just 15 degrees every hour. So If you mark your scale to correspond to 15 degrees on the recording paper, you will be able to tell what hours of the day the sun was shining brightly. The total length of burnt track can be measured and you then estimate the hours of sunshine that day. The proportion of the burnt track to unburnt gives an idea of cloud cover, of course.
Try different colored papers. Blue, for example, might be a good choice. Blue paper reflects glue light – that’s why it looks blue ! – which means that it absorbs red light – and there is more power in the red light from the sun that there is blue. Also, later in the day, or very early, the sun’s rays are filtered by the atmosphere to a great extent and will contain more red light than an midday. A paper you may have around that can be very sensitive is thermal paper. This is the stuff that used to be uses in faxes and portable printers. It is now used in printing receipts. Try drawing your finger nail across an unprinted area of a receipt. If it leaves a narrow black streak, then it is thermal paper – the frictional heating of the paper by your fingernail is enough to release the encapsulated ink in the paper and bring out the black colour.
Try other thin sheet materials. Some of the most sensitive sheet materials that I found were coated plastic films like magnetic tape and carbon copy paper. Indeed, some of these are so sensitive that even a standard small (16mm) marble will focus the sun sufficiently to leave a trace, even on an October day in England, when the sun is not famous for being strong.
The Science
The choice of paper for the sun-recorder is important because the power density of the marble-focus will probably be rather low for burning paper. If you choose a white paper which reflects much of the light, then there may not be enough power to heat the paper up sufficiently to char it. A colored paper will in general absorb a lot more power and hence heat up more and is more likely to char.
There is also the effect of the infrared component of the sun. The IR sunbeams will focus a little further out than the optical focus. Hence the need to ensure that the recording paper is placed a little further from the marble than the purely optical focus. But this also affects the choice of paper. A paper that absorbs red and IR components of the sun will do better too. The graph below gives an idea of just how much more power of the sun lies in the IR – on the order of 50%.
The background / support for the paper is also important. On a conductive metal backing, the paper would have be heated by a stronger beam to get it hot enough to burn.
Finally, the theory of burning glasses is interesting: the most efficient are of large diameter and short focal length. Why ? The simplest way to see this is to think about area and power. The power from the sun coming via the lens must be maximized, and this is simply proportional to the power per unit area coming from the sun, Ps, which is 1360 W/m2 at the top of the atmosphere – times the area of the lens, which is just π d2/4, where d is the diameter of the lens.
So Power P = ¼ Ps.π d2
But all this power has be concentrated on as small an area as possible. Now you can’t focus the sun infinitely: you can only focus it down to an image, whose size reflects the angular diameter of the sun in the sky. In fact the angular diameter of the sun is Ds (it’s about 0.5degrees), then the image formed will be Ds.f across, which has an area of ¼ π (Ds.f) 2 So now we can calculate the power density Pl from the lens, which is power divided by area:
Pl = Ps.d2 /(Ds.f) 2
The lens has concentrated the power density from the sun from Ps to Pl, an increase ratio of Pl/Ps, which is just (d/(Ds.f)) 2. The power concentration effect of the lens is thus proportional to the square of d/f, and f/d is a factor often quoted for lenses of optical instruments like cameras – it is the f-number. A smaller f-number gives you a better camera, because a smaller f-number gives you a larger power concentration factor, which is important if you are trying to take a picture in dim light. And it’s the same with the Marble Suncorder. The f-number of a sphere like a clear marble is a constant, varying only – and only slightly – with the refractive index of the glass.
There are other more subtle effects. The effective focal length of a sphere lens Feff is given by :
Feff = 0.25 nD /(n-1)
If the refractive index of your marble is too high, then it won’t focus light at all. Use the formula dn you see that with an index of around 2 or more, Feff = D/2, so light is focused at the inside of the marble and will be 100% retroreflected ! This fact is used, using dopants like titanium to get the refractive index very high for spherical retroreflector beads.
There is also an issue with the focus not being a spot, but being a kind of cone. Finally, there is always that unwanted but all-too-common feature of toy optical devices like microscopes and telescopes: chromatic aberration. The refractive index of marble glass varies with colour, and varies even more counting in the UV to IR wavelengths of the sun that will go through glass. This decreases the sharpness of the focal spot.
And finally…
Why not try more radical alternative recording papers ? Does thermal fax paper work, for example ? Try recording tape, as used for video and audio recording. And what about patterned paper – what happens when your recording paper is patterned ?
Polar Marblecorders
The recorder, you might think, can only record sun over a day of maximum length 12 hours – because the paper will get in the way of the light coming in. Not so ! Light entering the sphere over a wide zone – not just the centre – will focus down on to the recording strip. Light passing by the back of the recording strip on one side and be focused onto the strip on the other wise. So, although some light is blocked by making the recording strip rather narrow, you should be able to make a >12 hour Marblecorder.
By mounting such a recorder on a high site with very good views down to the horizon, especially in high latitudes, it might be possible to get a recording over more than 12 hours. Someone living in the polar regions might in principle be able to record the sun for 24 hours at the height of summer. So your challenge is: can you get a record of more than 12 hours ? Bearing in mind the low power of the sun near the ends of the day, this isn’t going to be easy.
…
…
…
The Amazing Spinning Marble
A small electric motor, a little rubber pad, and a some batteries are all you need to set a marble spinning. A standard marble will spin for 2 1/2 minutes or so, a 30mm Monster marble will spin for 10 minutes. That’s an amazingly long time, for any little doohickey to just to carry on spinning, without any power source.
video coming soon…
Energy has been stored in rotating objects, and it still is. There used to be busses in Switzerland which had a huge flywheel to get them up steep hills (they have quite a few of those in Switzerland!) storing huge amounts of energy to drive the weight of vehicle and passengers up. And today, one of the world’s premier sites for nuclear fusion research, JET (Joint European Torus) at Culham, Oxford, UK, uses motors to put energy in flywheels, which then run dynamos to provide huge pulses of electricity to start and run the fusion reactor for a few minutes.

What you need:
- marbles of different sizes eg. 16mm, 22mm, 33mm. Choose ones with a pattern so it is easier to see their spinning motion
- small 3V electric motor
- battery pack, eg. 3 AA NiMH 1.2 V batteries
- switch, a momentary on switch like a microswitch or push-button designed for an amp or so of current
- wheel which push fits onto motor shaft, eg. gear wheel
- small round rubber pad to glue onto the centre of the wheel, ideally with a small concave hollow in the middle.
- wires, solder, hot-melt glue etc.
What you do First attached wires to the motor, adding tape or, better, a blob of hot-melt glue, to stop the wires from breaking off near where they are soldered. Now form a circuit with the battery pack, switch and motor in series, with the battery positive supplying the switch, which carries onto one of the motor terminals, returning the other motor terminal to the other (negative) battery terminal. Push the wheel onto the motor and stick the rubber pad on in the middle. If it doesn’t have one, try to create, perhaps with a drill bit (rotated by hand) a slight conical hollow in the middle of the rubber pad on the wheel. Or you could hold the drill in a vice and rotate the motor to abrade a slightly hollow in the middle.
You need a good surface to spin on. It should be hard, such as glass or glazed ceramic (which is pretty much the same thing). Ideally, this would be a surface with a very slight concave upwards surface, to encourage the marble to stay roughly in the centre. Now try spinning your marble with the motor. Holding the motor with your (right) hand, press gently down on the top of the marble, motor shaft vertical, and press the on switch. The rubber pad should give you a smooth rotation of the marble. Just get the marble spinning a little, just a few rotations per second and then pull the motor off and stop it, letting the marble continue spinning. With luck, it will continue spinning for half a minute. Now try again, but this time spin the marble up to a slightly higher speed.
You may find that the marble begins to move fairly slowly in small circles on the surface. This is OK. But if the circulation motion increases in speed and in circle size, then you are in trouble… the speed and circle size accelerates spectacularly until the marble shoots off at high speed. A soft surface around the hard surface, and some cushions or something to catch the high speed spinning marble may be helpful to avoid marble-related damage to your marble or your historic Ming vase collection. Once you have got the hang of starting the marble spinning neatly and you have identified a good surface you won’t need take these precautions.
Now try successively higher speeds, monitoring the stability of the the marble as you go. If all is well, try once more, but this time wait until the motor rev pitch has peaked, so it has clearly reached its top speed and see how long it will continue. Try different marbles. See if any work better than others. If some won’t spin stably, look carefully at them, to see if they have blemishes which would stop them spinning properly. Try different sizes, noting differences in stability, and, of course, in spin time. Try each one a few times to get a good average. Does the average change with marble size in a predictable way ?
The Math and the Science: the storage of energy in a rotating object follows the same sort of algebra as the kinetic energy of an object going in a straight line. The KE is given by 1/2 m v² in the case of linear motion, and 1/2 I Ω² in the case of rotating motion. Omega is just the rotation speed, in radians per second, while I is the ‘moment of inertia’, which is given by integrating m r² over the volume of the spinning object. In the case of sphere like a marble, I = 2/5 m r ² . So if you 2x the size of your marble, you increase by a factor of 4x the stored energy in the marble. So maybe it isn’t surprising that a 30mm marble can go for 10 minutes if a standard 15mm one goes for 2 1/2 minutes. But is this the whole story ?
And finally, further challenges… Could you find an even bigger marble and see how long it would go for ? Would a 60mm marble spin for 40 minutes ? And what on earth could you do with a marble that spins for such a long, long time ?
…
…
…
Marbles and Magic Chinese Water Paper

When we learn to write, we have to practice quite a bit to improve our manual dexterity and hand-eye coordination. Try writing with your left hand (if you are right-handed) to remind youself just how much practice you needed when you were young. Supplies of inexpensive paper are typically deployed in this process. But when you learn to write in China, you have vastly more symbols to learn than in other countries, and you really need some genuine calligraphic skill. To get good at calligraphy requires much practice, and truly prodigious supplies of paper. You could make thermographic paper (see Liquid Nitrogen demonstrations section) which can be re-used many times. But it is a bit clunky having to write with a heated pen and, even more, having to erase with liquid nitrogen ! Fortunately, there is an alternative: Chinese magic water paper. This turns black when wet, then turns back to white again as it evaporates and becomes dry again. This turns up give an unexpected physics bonus when combined with wet marbles.
Marbellous Parabolas ! The simplest way to draw a parabola in the air is simply to throw a ball into the air. Newton’s Second Law and gravity together ensure that the upward component of velocity will decrease with time to zero and then reverse, so that the ball vertical position versus time will follow a parabolic curve. If the ball has a component of velocity in the horizontal direction, this will be a constant (Newton’s First Law). So the actual position of the ball in the sky will follow a parabolic curve just like a graph of vertical position with time.
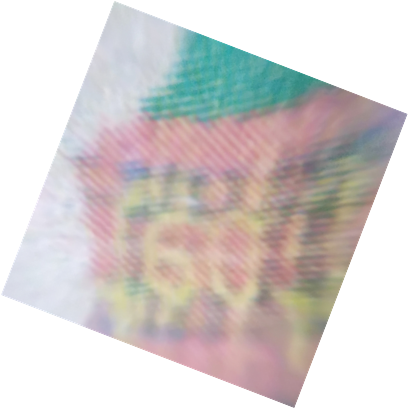
Drawing a parabola on paper requires a sloping board and a ramp rather than a throw to launch a marble. And of course, a sheet of the simply marbellous Magic Chinese Water Paper. The picture shows the result of a large (22mm) wetted marble rolling down a ramp and then up the slope of a gently sloping board with the Magic Paper on it. You can make the result more permanent by taking a photo of it with the camera on your phone, or another camera, maybe printing it you want to. Or maybe more simply by placing a thin piece of paper over it and marking with a pencil the line of the curve indicated on the Magic Paper.
Try plotting a parabola to fit one of the curves you have made with a marble. Measure the width, w, and the height h of the parabola. Now plot a curve y = a x² , where the constant a is calculated by a = 4h / w² . So for example, if your curve had a base width of 50cm, and a height of 40cm, then a = 16/250. You can use a spreadsheet to tabulate the results to plot if you like. So y = 0, plotting every 10cm, you would have:

Why should a marble rolling along a sloping plane plot out a parabola, just like a projectile free-flying through space in a gravity field ? Firstly, the effect of the plane is to ‘dilute gravity’. The effective gravity field for a particle sliding frictionlessly on a board of slope A to the horizontal is not g (9.81 ms-2) but g tanA. For example, with A = 10 degrees, g is reduced to 0.18 g, or 1.73ms-2 But otherwise, a sliding particle on a slope will be deflected downwards by gravity, just like a free-flying particle does.
Secondly a marble has both translational and rotational kinetic energy as it rolls, because it both moves along and goes round and round. In fact, this doesn’t change the shape of the curve either, it just changes the amount of speed gained in a particular gravity field, reducing it. The rolling ball has translational kinetic energy of 1/2 m v² , while it’s rotational kinetic energy, given by the analogous formula 1/2 I ω² is 2/5 as much, where I is moment of inertia of a sphere and This gives a total kinetic energy of 7/5 . ( 1/2 m v² ). So a rolling marble speeds up rather more slowly than a sliding particle under a gravity field, but still in the same way. In effect this further reduces the effective gravity from g tanA to 5/7 g tanA .
Why is the curve parabola shaped ? Considering only motion in a vertical (upwards) direction now, F = m a (Newton). Now force F in this case is just gravity, F = – m g. m is the mass of the ball, g is the gravity, while there is a – sign because gravity is downwards.
So m g = m dv/dt, since acceleration a is the rate of change of speed. So dv/dt = – g, which is a constant, which leads
v = Vo – g t.
where Vo is the starting speed, and g t is the change of speed with time. But v = dx/dt, which leads on to
x = Xo + Vo t – 1/2 g t²
which is of course a parabola. (Xo is the starting position).
Large Marble Collider experiments: one of the nicest ways to observe a marble collision is to roll a wet marble towards another wet marble on a sheet of the Magic Chinese Water Paper. The picture shows two large (22mm) marbles colliding. (The fuzzier blobs on the picture, by the way, are the results of a previous test, mostly evaporated.)

Large Marble Collider experiments on a slope: to add another dimension – that of speed measurement – to marble collisions – requires that you do the whole collision on a slope. As we now know, the curvature of the track tells us about the velocity of the marble, at least the horizontal component of velocity. If you looked closely at the picture above, you will noticed a slight curvature in the upper track – this was accidental, since the board was resting on a table which was not quite horizontal. The picture below shows a collision on a deliberate slope, with the stationary marble resting on a tiny piece of grit before the collision.

Real Physics of Colliding Marbles: Beware ! As we have already hinted at, marbles don’t behave as ideal colliding particles that we normally study in physics, in quite a few ways. Marbles roll with low friction, rather than sliding with zero friction. The friction makes a difference relative to an ideal particle, of course, the it is the fact of rolling rather than sliding that actually makes an even bigger difference. Rolling stores up energy, so that the kinetic energy of a rolling marble is not the same as a sliding marble.
And the story doesn’t end there: the collision of marbles involves transfer of momentum, of course, and the collisions are not fully elastic, which makes a difference. But the rolling motion of marbles on a board once again leads to complications. The book by Ron Shepard cited below is one of several which gives powerful insights to all these effects.
Two Moving Marbles: Although both marbles can be moving, this requires some additional skills in timing and possibly just a little luck in the timing.
More coming soon…
References
Ron Shepard, Amateur Physics for the Amateur Pool Player, this is available as a great little free e-book from Argonne National Lab. It gives lots of the physics behind pool, billiards and snooker, and of course this gives lots of details that are useful in understanding the marble collisions above. And of course loads of the physics of real balls – all-the-physics for pool balls turns out be a whole lot more than school physics normally covers !
