What is clear, liquid and looks boring but isn’t ? Liquid Nitrogen! Actually, it’s fascinating stuff. It’s incredibly cold (-195 C), stunningly low viscosity (10x less than water) and expands 700x when it boils. I spent over 20 years working with companies that make liquid nitrogen (and LOX, liquid Helium, liquid Hydrogen and other more exotic cryogens), and I never stopped finding interesting properties and effects, some of which make great demonstrations. You have to be careful with it – make sure that you get some training before you play around with it. But there are dozens of demonstrations and experiments you can do with liquid nitrogen, using its exotic properties. But here are a small number that even those who know about liquid nitrogen probably won’t know about…
SAFETY: beware all the hazards, obvious and not so obvious, with liquid nitrogen. Not only is it cold enough to cause almost instant cryogenic burns, just as bad as those from a red hot metal or flame.
That said, the Leidenfrost phenomenon, the formation of a film of gas which takes place instantly as LIN touches room temperature surfaces, does provide protection. If you are wearing gloves, and the LIN can penetrate inside them somehow, then you need to get those gloves off in a second. (Sometimes its better not wear gloves, relying on Leidenfrost protection. But then you have to be very careful that you don’t touch a cryogenically cooled surface, to which your fingers can stick, causing another sort of burn injury.) In a confined space people are regularly asphyxiated by nitrogen, and it expands over 700x when it boils, giving rise to hazards when it is sealed in container (which includes the human body – don’t even THINK about putting it near your mouth).
- The Liquid Nitrogen Ping Pong Ball Hero Turbine
- The (Thermographic) Liquid Nitrogen Cheshire Cat #cheshirecat
- Pouring ‘ectoplasmic’ LIN through things like your shirt #ectoplasm
- Boiling Whistling Kettles on Ice #kettleonice
- The Cryogenic Traffic Light #trafficlight
LIN Ping Pong Ball Hero Turbine
The ‘Aeolosphere’ or steam turbine is not exactly a new invention. Heron or Hero who lived in the Greek city of Alexandria in Egypt AD10-70, invented it. The extraordinary genius of classical Greece described it, along with a host of other air and steam devices in his Pneumatica and his other books on automatic machines and light.
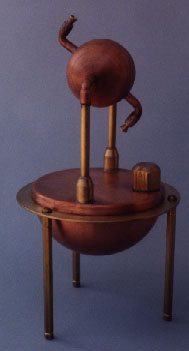
It wasn’t until the Parson’s company up in Newcastle in the 19th century took similar ideas to Heron’s and started to make useful power out of steam turbine technology. The steam turbine they produced went on to power high speed ships and turn electric generators which still keep most of electricity we use flowing to our homes today. Today’s steam turbines deploy multiple rotors and stators, disks with aerofoil blades at their perimeter through which the steam flows axially through the blades. This allows them to much more efficiently use the power of the steam. Today, the Hero-style turbine seems to be confined to scattering water over lawns, in the form of the rotary lawn sprinkler.

What you do: take a standard ping-pong ball, take a sewing needle, one of maybe 0.5 mm or so shaft diameter, and make two holes, opposite each other, but you must make the holes in a peculiar way. Push the needle into the ball, making a hole, as you might expect, but then bend the needle over until it is almost parallel to the surface of the ball. The holes must face in opposite directions, so that they will both provide a twisting torque force in the same rotational direction.
ping pong ball marked for fast rotation and so show directed vent hole
Next, mark up the ball with a permanent marker pen in something like a bold spiral design. This will allow you to see the spinning of the ball better.
Now take a pair of tongs and hold the ping-pong ball underneath the surface of liquid nitrogen in a small bucket Dewar. Hold it there for 30 seconds or so. Now take it out, and drop it onto the smooth hard floor, or maybe onto a smooth-surface tray on a table. You can try to give it an initial twist with the tongs to start it off, although this probably isn’t really needed. After a few seconds, the ping-pong ball will rotate slowly. Then, at some point, the pressure inside will go up sharply and … WOW ! ! ! . . . the ball will accelerate to an enormous RPM, making a humming sound as it whizzes around.
Things to try: how many holes is best ? Does one hole work ? What about the size of the holes ? Can you get two or more Ping-Pong Turbines spun up and running at the same time ? What happens when they touch each other ?
And finally… Can you mount the ball so that it stays in one place ? Perhaps simply gluing it on top of free-running ball bearing like a ‘fidget spinner’ bearing ? Once you have done that, you could try measuring its speed of rotation with an optical RPM meter. But maybe simply tacking onto the probe of a mechanical RPM meter would be better ?
And what is happening when the ball accelerates rapidly ? Could this be a change of boiling, caused by the Leidenfrost Effect. In other words as the LIN changes from sitting in the middle of the ball, insulated by a layer of nitrogen gas, to touching the wall of the ball and boiling more vigorously, raising the pressure. Could you connect a small tube from the ball to a pressure gauge of some kind to check this out, at least with the ball not rotating ?
References:
Kostas Kotsanas,The Inventions of the Ancient Greeks ISBN 978-960-92786-7-6
…
…
The Liquid Nitrogen Cheshire Cat
“Well! I’ve often seen a cat without a grin,” thought Alice; “but a grin without a cat! It’s the most curious thing I ever saw”
Lewis Carroll, Alice in Wonderland
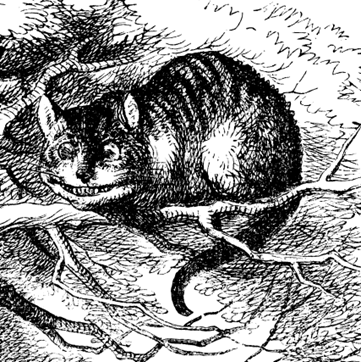
Lewis Carroll once described the very curious Cheshire cat. The cat could suddenly appear and disappear, but following a request from Alice, tried disappearing slowly. But Alice found that the cat disappeared slowly but left it’s grin around for quite a while after the rest of it had disappeared completely. Curious indeed. But a drawing of a cat can behave exactly how Alice described it. Read on…
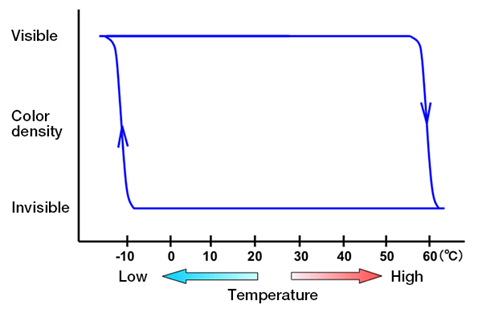
Thermographic ink is ‘simply’ ink that changes colour with temperature. There are many different varieties. Some change once, some change over just a few degrees, some do other things. The types we are looking for change to one colour when heated way above room temperature (typically colourless) and ‘lock’ in that colour until subcooled hugely below room temperature, when they they change back to their original (usually coloured) form, and they then lock into that. They are normally made by developing further the subtle chemistry of leuco dyes.
This video shows you the Cheshire Cat demonstration working. I am sure that Lewis Carroll would be intrigued… https://youtu.be/q2ESupVwjpI
What you need:
- liquid nitrogen
- Open-topped Dewar vessel at least 20cm 8″ deep
- Frixion pens in darker or brighter colours – suitable leuco dyes
- thick (100 g or 120g) paper, A4 / quarto size
- plunger to expel ink from pen
- smooth edged metal spreader tool of some kind
- smooth tipped hot tool eg. curling wand (see below)
- address labels or similar self-adhesive paper labels
What you do: The first challenge here is to find a spreader which will then spread this blob of ink evenly over the paper without damaging the paper surface. A piece of round metal rod a 10 cm long, perhaps, or a plastic glue-spreader might be suitable. Having found your spreader, practice wiping an imaginary blob all the way around the paper, and then find a plunger for pushing the ink out. The plunger could be a piece of fence wire or similar: it must fit neatly into the biro cartridge, a good but free-running fit. Now you need to extract the ink. The pen cartridge has a ball-point at one end, and a clear gooey stuff at the open end. Cut off both ends of the biro ink cartridge with a sharp knife and push the ink out with the plunger. Cut off the ball-point end, then cut off the other end where the clear stuff touches the ink. Now use the plunger to push it out onto the paper in a blob. Working quickly, spread out the ink all over the paper, then allow it to dry for 5 minutes.
Now you have to draw the Cheshire Cat that is going to do the disappearing act, using a hot tool of some kind. A hair styling tool sometimes called a ‘curling wand’ is ideal: it is just a non-stick coated electrically heated hot stick with a round tip. Some curling tongs have a round tip which would do too. If you can’t find one of these, you could use a round tip on a thermostatic soldering iron, set VERY low, or a household clothes iron, again set very low. Then let your artistic flare run wild and draw your best Cheshire Cat. If you need inspiration, where better to start than the Sir John Tenniel illustrations for the original editions of Alice in Wonderland ?
Time for a liquid nitrogen test. Fill the open-topped Dewar deep enough that it will immerse the paper, curl the paper slightly to conform to the Dewar and, and, using a pair of tongs or long-nose pliers or similar, dunk it the picture. Allow to cool for 30 seconds, then pull it out using the tongs, straighten it, and allow it to warm in the room. Check out the timing of the drawing fading away – I find with typical quality paper it is 10-20 seconds.
And finally, the Cheshire Cat Secret: Getting the Grin without the Cat... the secret here is that the grin must remain cooler for longer in some way. One way, perhaps the simplest, is simply to thicken the paper in the area of the grin by sticking multiple layers of self-adhesive labels. A few tests will prove the point, but 3 or 4 might be about sufficient. When dunked, this area will then get down to -196C, and will remain well below room temperature for 30 seconds, unlike the rest of the paper, which will warm in the room air in 10 or 15 seconds or so. Another approach is to try to keep a minute amount of liquid nitrogen in a more porous piece of paper – blotting paper or tissue perhaps – carefully clued to the back of the paper. Try it to see if you can make this work better than the labels approach.
Why it works: Leuco dyes are chemicals – some natural, most not – which change colour with conditions around them. The leuco prefix comes from the Greek for white or clear, hence its use in the medical term for white blood cells, leucocytes. A leuco dye can take on two forms, a colourless, or coloured, after a small structural change in its molecule. The natural dye indigo, for example, is coated onto cloth in a white form called leucoindigo that consists of two carbon rings and two carbon rings with a nitrogen atom, with two -OH side groups. When it oxidizes in the air, it loses two hydrogen atoms from its side groups and converts to an intense deep blue indigo colour. The leuco dyes used in Frixion pens is supplied combined with a colour developer molecule. When heated above around +65C, this molecule detaches and attaches to another molecule, and the leuco dye becomes colourless. On cooling to below, say, -20C, the reverse process happens and the dye molecule colour once again comes through. The key point of all this fairly difficult chemistry is that in the temperature interval -10 to +60C both forms of the ink, the colourless and the coloured, are stable: the ink has a ‘memory’.
References
Frixion pen ink described in detail: https://www.nippon.com/en/features/c00520/the-science-behind-frixion-erasable-pens.html
Disappearing – Reappearing Ink also has star role in the famous half-cartoon half-actors movie “Who Framed Roger Rabbit” by Robert Zemeckis, starring Bob Hoskins.
…
…
Pour Ectoplasmic Liq. N2 thru Shirt
The viscosity of liquid nitrogen is very small – extraordinarily small. Water has a low viscosity, only 1000 microPa s, but LIN is only 150, 6x lower. This is the simple basis of this very simple demonstration.
It highlights one of the hazards of handling liquid nitrogen: that it will go through cloth, and that you can end up getting a cryogenic burn if there is enough liquid there and your skin is touching that cloth and you don’t remove the cloth immediately. That is why gloves for handling liquid nitrogen are specially made, with materials that are almost impermeable compared to normal cloth. But it is fun to do !

What you do: Just pour LIN through a shirt. I usually choose a standard inexpensive (but second hand) white shirt, of the sort worn with a suit for business. It seems to work OK with cotton-polyester materials. The only thing that might go wrong is if you chose a thick, close weave shirt, or pure cotton. The latter has a larger amount of absorbed moisture on its microfibres and might create trouble. You should find that you can pour LIN through the shirt fabric onto the floor, streaming in bulk and boiling on the floor, with almost zero puddling on the material. Try it then with water, and the water will puddle nicely up to a centimetre or two depth, just dripping through.
And finally… But what about the effects of surface tension ? The surface tension of liquid nitrogen is lower than water: LIN is 9, while water is 70 mN/m. Could this also be enhancing the effect ?
…
…
Boiling Whistling Kettles on Ice
The simple basis of this demonstration is the simple fact that ice made from H2O melts at 273 Kelvin, whereas liquid nitrogen boils at 77 Kelvin. So a kettle with LIN will boil happily on a large block of ice.
What you do : You need a stainless steel camping kettle with a whistle and a large block of ice with a nice flat top.
…more coming…
…
…
The Cryogenic Traffic Light
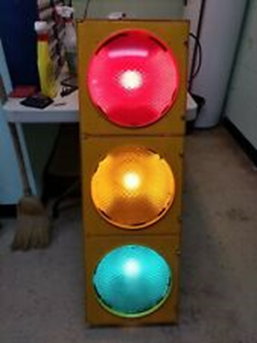
The Cryogenic Traffic light is a set of LEDs, Red, Amber and Green, laid out like a standard traffic signal. When dunked in LIN, the bottom light, the green one, turns yellow. What on earth is going on ????? Read on for how to make one, and why it works. But first, the video… https://www.youtube.com/watch?v=mSYM6JKg_Js.
What you need, What you do
You will need a set of light-emitting diodes, LEDs, in red and amber (yellow-orange). If you pick LEDs with the colours that are actually used in real on-the-road traffic lights, then the amber colour will be the correct frequency to be changed to green. The traffic light is easily assembled on ‘Veroboard’ or on a printed circuit board. However, cryogenic (-196C) to room temperature (20C) cycling does tend to crack stuff, and this includes circuit boards. The copper track seems to want to split off from the glass-reinforced plastic base, so don’t use any narrow tracks. There needs to be a current-limiting resistor for each LED, or with many LEDs, for each series-wired set of LEDs. Don’t forget that LEDs are diodes, so they need to go the correct way round in the circuit to work. And of course you will need a DC power supply.
The diagram shows the kind of circuit. It’s nice to make the physical layout in the form of the three lights of a traffic light, red, amber and amber – the latter set turning to green in the liquid nitrogen, of course. Finally you will need a vacuum insulated open-topped ‘Dewar’ vessel, or even better from a visibility point of view, a cryogenic-rated clear vacuum Dewar (although beware: these are fragile, they can shatter).
Plug in the traffic light to get it working, Then dunk in the liquid nitrogen.
What’s happening ?
The LEDs have band-gaps in their electronic band structure, just like atoms have a line-gaps in their electronic line structure. When an electron in an atom drops from one line to another – one energy level to another – one orbit to another – it emits a photon, which can be a visible light photon, of course. Similarly, when an electron in the LED semiconductor crystal goes from one electronic band to another, it emits a photon, which is typically from ultraviolet to infrared in energy.
The band structure arises in that there is a the ‘sea’ of free-drifting ‘conduction’ electrons in the crystals of the semiconductor (gallium phosphide etc) of which LEDs are made, and a bunch of electrons attached to atoms in the crystal. These two groups of electrons can have any energy level within their band, the conduction band and the ‘valence’ band. But they can’t have an energy values in a gap – the band-gap between the two. So when electrons are forced from one to the other, by forcing a current through the semiconductor across a PN junction (the diode part of light-emitting diode) they will emit a photon of energy corresponding to the the band-gap energy Ebg, according to Ebg = h f , where H is Planck’s constant, and f is the photon frequency.
Now it so happens that this band-gap changes with temperature slightly. Just as the crystal expands and contracts with increases and decreases in temperature, so does the wavelength of the light that the LED emits.
Now the shift in colour of an LED with temperature is normally so small that you can’t see it. BUT, when that temperature shift is spectacularly large – over 200C, AND when that shift in colour is in the amber-green region of the visible spectrum, you can.
The amber-green area is crucial, because the colour receptors (cone cells) in the human eye are very close in their sensitivity to light of different wavelengths in this part of the spectrum.
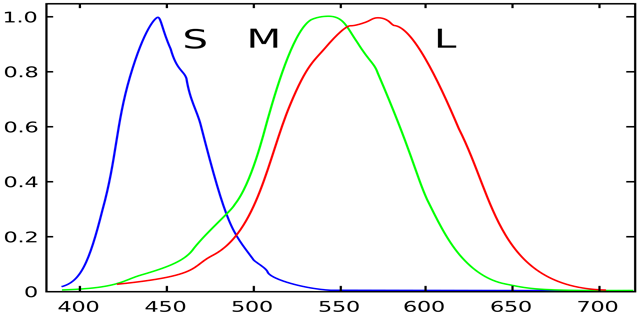
Temperature dependence of LED and laser light wavelength is a much studied phenomenon. Lasers can fail to operate correctly if they shift too much in frequency, and many of them have to be temperature regulated for applications such as optical fibre communications. Another problem caused by the phenomenon is in pulse oximeters, those little gadgets that you see in hospitals that shine a couple of LEDs (IR and red) through your finger to measure you pulse and check that you have enough oxygen in your blood. A study of the temperature dependence of LED colour was carried out on pulse oximeter LEDs and found 5.5nm shift over 50C for a red LED at 660nm. This would translate into a ~ 4.2nm shift at a 500nm and 50C, or 18nm over 215C. Such a small shift is only visible to the human eye in the 500nm region indicated in the graph above.
References:
John Moyle, Pulse Oximetry, Wiley-Blackwell (1994)
British Journal of Anaesthesia 1991; 67: 638-643
K. J. REYNOLDS, J. P. DE KOCK, L. TARASSENKO AND J. T. B. MOYLE Temperature dependence of LED and its theoretical effect on pulse oximetry.
